OctoPress is embraced for its simplicity: write blog posts, save them, generate HTML pages and move those upon a web server. As no code is executed server-side every page can be cached and security risks are low.
So far I’m hosting my blog on a rented hetzner root-server in Germany. While there’s no server-side security problem I’m still using a full blown server which imposes maintenance overhead on me. No peace of mind. An alternative would be moving to the cloud (Amazon’s S3 storage in my case), but is it worth it?
In my experience just moving Octopress to S3 is not enough, it will be slower than the original setup. But add Amazon’s CloudFront content delivery network to the mix and everything changes..
Preparing Octopress for S3
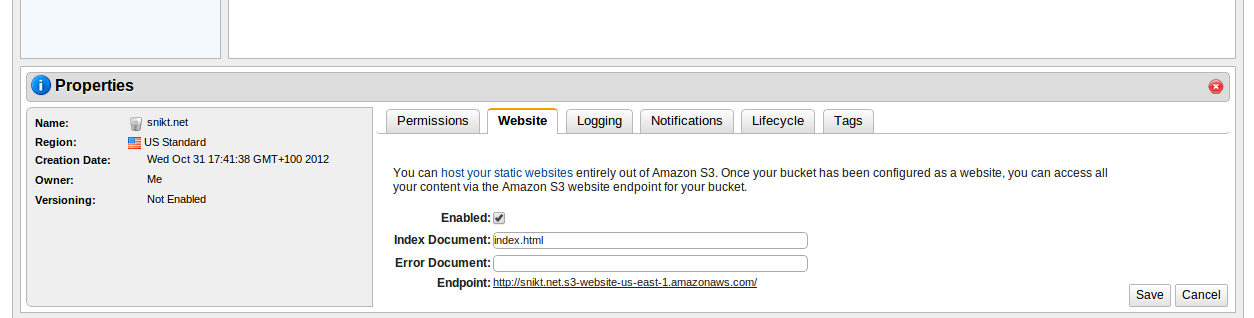
First of all OctoPress needs access to the S3 infrastructure. To achieve this create an S3 account on Amazon’s Webpage. Within the management console create a new storage bucket named the same as your website. In my case the storage bucket is named “snikt.net”. You’ll also need to configure some settings: first of all go to the website-tab and click the “Enabled” button, second of all add “index.html” as Index Document:
We will be using the s3cmd to transfer the generated web site to Amazon S3. To achieve this, we will install an auxiliary utility, add a S3-deployment task to OctoPress’ configuration file and finally deploy our webpage. Let’s start with installing s3cmd:
|
|
The S3 command asks for you Amazon credentials, those can be viewed from within your Amazon S3 management console (website). Next we’ll be adding an S3 deploy task to the Octopress Rakefile configuration file (copied from Jerome’s Blog):
|
|
Also add the following configuration data to the front of the Rakefile:
|
|
Now the blog can be deployed to S3 through “rake generate && rake deploy”. You can test it through your personal S3 URL (which can be seen within the Amazon Management Console, at the bottom – you can see it in my screenshot).
Optimizing OctoPress for S3
We’ll be paying for both transfered data as well as for the amount of data requests. We can reduce the former by adding the “jekyll-press” gem (which in turn needs therubyracer) to our Gemfile:
|
|
This will transparently minimize all JavaScript and CSS files before uploading them. The benefits for my blog were:
{::options parse_block_html=“true” /}
| file type | before | after | change |
|---|---|---|---|
| JavaScript | 136KB | 96KB | -30% |
| CSS | 48KB | 44KB | -9% |
The overall reduction for CSS/JS was around 25%. Even as this is only a small fraction of the overall transfered data every small stop helps.
But how is the performance?
To test performance I’ve tested my blog against the Hetzner server (Intel i7-920 Octocore, 8 GB memory using 4 nginx workers) against S3 (“ab -n 10000 -c 12..”, all values in ms):
| Server | Min | Mean | S.D. | Median | Max | 75% <= | 95% <= | 99% <= | |:—- | :—- | :— | :— | | Hetzner | 153 | 246 | 28 | 240 | 281 | 256 | 296 | 349 | | Amazon S3 | 392 | 724 | 162 | 774 | 3787 | 791 | 850 | 1010 |
Short answer: no-go.
Speeding up S3 with CloudFront
CloudFront is Amazon’s Content Delivery Network (short CDN) for speeding up delivery of static content. A deployed OctoPress blog is 100% static content so this should be a perfect fit.
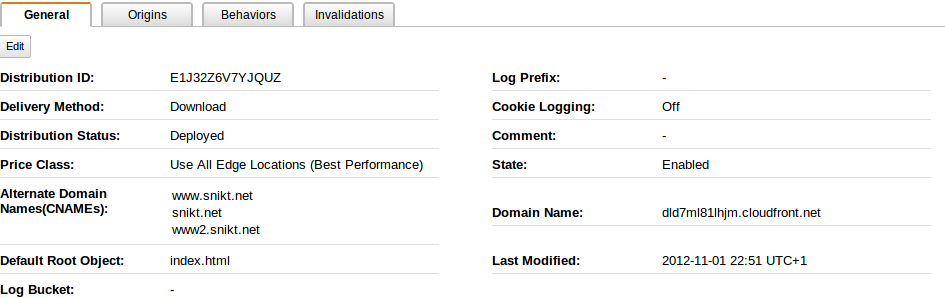
First of all create a CloudFront “Distribution” (within your Amazon Mangement Console) and point it to your S3 bucket URL. While the management console automatically suggests an internal S3 bucket don’t use this but paste your S3 bucket URL that you’ve tested before in your browser. Otherwise you will run into some error.
Give CloudFront some minutes to actually distribute your files before you check that it works. But how is the performance?
| Server | Min | Mean | S.D. | Median | Max | 75% <= | 95% <= | 99% <= |
|---|---|---|---|---|---|---|---|---|
| Hetzner | 153 | 246 | 28 | 240 | 281 | 256 | 296 | 349 |
| Amazon S3 | 392 | 724 | 162 | 774 | 3787 | 791 | 850 | 1010 |
| Amazon CloudFront | 77 | 125 | 22 | 122 | 376 | 134 | 158 | 202 |
Wow! That’s speed. But there’s also a drawback: after each deployment it might take up to 24 hours before your changes hit the CloudFront servers. This also means that you cannot ‘hotfix’ faults on your delviered pages..
The final step is to add the CloudFront URL to your DNS server. Just add the CloudFront URL (as seen in Amazon’s Management Console) as CNAME. In our example this would mean a CNAME of “www”, pointing to dld7ml81lhjm.cloudfront.net. Now all requests to www.snikt.net will be served through CloudFront.
But what about requests that go directly to snikt.net? Alas you cannot add a CNAME for the root URL of a website. But we can utilize a free webservice by wwwizer to overcome this: just enter 174.129.25.170 as A record for your website. WWWizer will automatically redirect all traffic to this IP to the same domain but with “www” on front. For example if the request was for “snikt.net” the request will be forwarded to “www.snikt.net”. I will use “www.snikt.net” in future references to my website but at least this is a cheap and easy workaround for poeple acessing snikt.net directly. Thanks to Jerome for mentioning this on his blog!
Next: Profit!
By now we’ve removed the need of maintaining an server of our own and have cut access time in half without any change to the OctoPress workflow. In addition usage of the global CloudFront content distribution network unifies access times geographically: it doesn’t matter if you’re accessing the website from Europe or America, there’s always an Amazon Server near you.
To the Cloud!